So basically… my work right now is a little like that song they always sang on Lambchop. You know what I’m talking about? This one.
Anywho, I’m trying to trudge through and do a bit every day. While not trudging through that process, I’ve also gotten a little crafty and bakingish in order to feel better about procrastination. For example…
Aimee sent me the most awesome gift for my birthday.
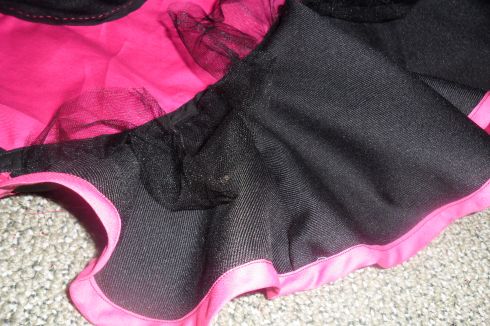
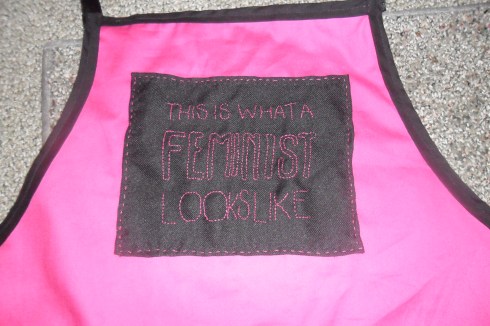
I was already trying to pick the most perfect present, but I could not find something on the same level of perfect giftyness, so I thought I would try to make something. Aimee is an awesome cook and has many excellent aprons, but I figured that she did not have a feminist themed one! My favorite baking blogger, Bakingdom, also makes aprons. She’s made a Harry Potter apron and a Tardis apron, and she was super awesome about sending me the pattern for the skirting at the bottom. I had this vision of an apron themed after the Feminist Majority Foundation‘s awesome This Is What A Feminist Looks Like shirts and things. As happens with crafts, my original vision did not end up being the finished project, but I’m pretty satisfied.
If you are ever jonesin to make an apron, you are more than welcome to use a pattern and do it all legit style, but if you are like me and don’t even know how to unfold a pattern… you can always just take an apron you already have and use that as a starting point. I am staying with people who have lots of aprons, so I went through a period of trying and seeing which parts fit the way I’d like the apron to fit.
A lot of the work was just making it up as I went. I had to take a picture of the skirt pattern, info about what the measurements were, and make a new pattern to scale. I measured the small side of the skirting to see how long the bottom of the apron should be, and then I used a paper bag (see how completely ridiculous my methods are?) and cut it to find the right curve for the bottom of the apron that would fit the skirt pattern.
I laid my ragtag pattern on top of the pink fabric and cut it out around the edges. I took a page out of Bakingdom’s book and used bias tape instead of trying to hem the thing, because basting and hemming makes me want to use my shins as pincushions. Just saying. So, I lined the edges of the apron with black bias tape and sewed it together.
Making apron strings from fabric has an effect similar to the basting and hemming on my state of stress filled zen, so I chose to use a thick grosgrain ribbon for the waist strings and a thinner grosgrain for the neck string. Easy peasy!
The skirt was a little more difficult, but I cut it out of the black fabric and lined the bottom with pink bias tape. I wanted the apron to be as bomb as possible, so I also opted for black sparkly tulle on top of the skirt. I also used bias tape to get the tulle and the skirt together and, again, avoid hemming. It was a little rough, and some of the edges were a little wonky, but in the end I felt pretty good about it. 
When I attached the skirt to the apron, I realized I had made the apron far too long. These things happen when you’re piecing it together like a puzzle. Anywho, you can always take away. I just pinned the skirt to the existing apron and tried it out until I found the right length. I sewed them together first so I could, you guessed it, avoid hemming the bottom. It worked out fine.
I wanted to add pockets, which was the easiest part of this process. I used the bias tape again and sewed them together using pink thread, because I like the hand-sewn look when you can see the thread. It’s like a little accent! Awesome.
My original plan was to somehow paint “This is what a feminist looks like,” using the Feminist Majority Foundation t-shirts as a template. Hahaha. Fast forward to me, covered in spray fabric paint, and awfully frustrated. Take two!
I like free hand embroidering. And it’s not fancy embroidery, I’m talking like straight lines and simple outlines. So, I took some of the extra black fabric and used pink string to sew “This is what a feminist looks like” on it. I actually hemmed this bit, mainly because it was just a square and a very small one, at that. 
And then… I started listening to Trock, which is short for Time Lord Rock (yes, I’m that cool) and Comic Con geeking out about Doctor Who. I have this side purse thing. You know, the kind that goes across your chest and hangs out on your hip, but is small so it isn’t in your way? I like it, but it doesn’t really go with some of my outfits, if you know what I’m saying. So! I took some of the extra fabric from the apron and made a really basic bag with a TARDIS on it! A very simple TARDIS, but a TARDIS nonetheless. 
I have also been doing some baking fun. I made a checkerboard cake, which is a variation of the vertical layer cake from Bakingdom. I fully intended to make vertical layers, but one of the yellow cakes broke, so then I had to make new plans.
It’s late and I’m super sleepy, so I’m going to be lazy and just point you in the direction of other people’s instructions that I followed to bake this cake.
I got the process from Bakingdom here, along with the recipe for the yellow cake. After having made the cake, I think that all vertical layer cakes should use that kind of cake for a base. It cuts easily, it is firm enough to move around with your hands, and it is just fabulously delicious. Seriously. Awesome. But I’m pretty pos that with patience, sharp knives, and extra icing on hand just in case, you can turn any cake into a vertical layer cake. Fo sho. I wanted to do a chocolate cake, so I used Aimee’s favorite, which is this one. It is totally delicious and perfect, but it is so moist and a little crumbly, so it’s harder to cut.
Basically, what you do is bake your cakes (and if you want to make a two layer high cake you need to bake two batches, or four separate pans of cake) and then level them off. Trick I learned from this tutorial: if you level the cakes really soon, no more than five minutes, after pulling them out of the oven, set them on top of each other (each double, not all four) and throw them in the freezer, it helps them stick together instead of being little cake cubes. Anywho, you bake them, and then you put the two layers of each kind on top of each other. (Bakingdom has a good in depth explanation with pictures.) Then, using a template or cutouts or bowls or what have you, you cut the layers into the cake. You make a little cut on one side of the rings, so you can wrap them around each other, and then you do just that. Then, frost! The frosting is kind of hard, because the cake comes off easily since you trimmed it and stuff. Woohoo! Here is my finished cake. I am pretty proud of my first attempt.
Annnnd on that note, I’m going to hit the sack! Early morning tomorrow, lots to do and stuff!


1. Best apron ever
2. “Crossbody bag”
3. It would probably be a little easier to frost such a cake if you either freeze the assembled cake for like an hour or two before you frost it, or if you do a crumb coat.
4. Love you and miss you!