Tag Archives: baking

The Cupcake on Fire/The Katnisscake

10 Apr

As some of you may recall, I like making up literary themed recipes for cupcakes and baked goods and filing them away for the eventual opening of my (now brewery/) bakery where all of the baked goods are based on literary characters.

I was inspired by a pumpkin spice caramel ghirardelli square to make the most recent addition a reality: The Cupcake on Fire (AKA The Katnisscake)

I used the Pumpkin Cupcake from Hummingbird Bakery as a base, ditto for their Cream Cheese icing recipe, but I made a few changes.

Cupcakes (makes 12):

1 c flour

1/2 c cocoa powder (I want to find a chipotle cocoa powder and try that in this recipe in the future)

1 t baking powder

1 1/2 t cinnamon (you can put in more if you like a really spicy taste, like I do)

pinch of salt

3 T unsalted butter at room temperature

1/2 c milk

2 eggs

pumpkin puree: the recipe calls for 6.5 oz, but most pumpkin puree comes in a 12 oz can (or larger). I generally eyeball half a can when I make this recipe and it works for me, but when making The Katnisscake, I add a couple extra tablespoons of pumpkin puree to make up for the added 1/2 c of dry ingredients (because of the cocoa).

1. Preheat the oven to 325.

2. Put all of your dry ingredients in a big bowl with the butter and beat with an electric mixer. Beat until it looks a bit like damp sand.

3. Pour in the milk a little at a time, beating constantly, until everything is combined.

4. Add both eggs, and beat until just combined.

5. Now spoon in the pumpkin puree, and stir by hand until just combined.

6. Taste check! Because some of the bits of this are my little tweaks, do a taste test to make sure the batter is significantly cinnamony and chocolatey for your tastes. If it tastes a lot like pumpkin (because there’s pumpkin puree in the batter) don’t be fooled: the flavor of the pumpkin puree fades with the baking.

Spoon into cupcake papers and bake for 20 minutes. They will look very full if you use all of the batter, but don’t worry, they will be fine!

Cinnamon Cream Cheese Icing:

6 oz cream cheese

3 T unsalted butter at room temperature

2 c powdered sugar

cinnamon to taste

1. Starting with 4 oz of cream cheese, begin by beating cream cheese, butter, and 1 c powdered sugar together with an electric mixer. Stop after about 30 seconds to taste. Note: I like my cream cheese icing to taste like slightly sweet cream cheese, so I use a very high ratio of cream cheese to powdered sugar. Start from this ratio and then add cream cheese or powdered sugar, depending on which way you’d like your icing to go.

2. Add cinnamon to taste.

3. Beat for at least three minutes on high once you have the right taste for your icing. This way it will be whipped and fluffy and delicious.

DO NOT ICE YOUR CUPCAKES UNTIL THEY ARE COOL. Your icing is too yummy to waste by applying it to cupcakes that are still hot!

Optional extra steps:

1. Sprinkle cinnamon on top of the icing for a little extra spice.

2. Before icing, cut a small cone out of the top of each cupcake with a small, sharp knife. Carefully spoon caramel sauce into the hole. Now you have caramel filling! If you do this, be very careful when icing or the caramel will come out and ooze everywhere. Consider yourself warned!

If you aren’t going to eat these immediately, I suggest storing them in the fridge and then letting them thaw for about 30 minutes before eating. Otherwise, the cream cheese icing gets a little wonky.

Enjoy!

Sometimes I Try To Bake And I Succeed!

7 Sep

Hello lovely readership! All five of you! 🙂

I recently read this fabulous post by my absolute favorite baking blogger, Darla. Then when I was ordering my groceries for delivery, due to my lack of wheels in my living in this godforsaken place called New Jersey, I decided to go for it and ordered all of the components for this easy and yummy meal that will last foooooreeeeeveeerrrr (For the right effect, read that in the voice of those little green aliens from Toy Story. These guys.). I mean, it makes about twelve servings because you bake it in a 9 by 13, so for a person only feeding herself, it will last a really long time. I plan to freeze half of it. In little servings. Little servings of yummy pizza pastaness.

OK! Back to business.

You can find the entire recipe and all of Darla’s helpful insights here on her blog Bakingdom. I will just give you the general overview of how it went in my kitchen which, for once, was swimmingly!

First, you cook your pasta! I chose whole wheat organic pasta because I’m cool like that, and I figured if I was going to be eating something with “pepperoni” and “pizza” in the name I ought to use the healthiest ingredients possible. Plus, I like being full and I hate being hungry. Whole wheat pasta keeps me full for longer, in my experience, than normal pasta. Now that I’ve plugged whole wheat pasta fo FREE, on we go!

if it looks slightly awkward, that's because I took this picture after it had been chillin out for a while.

The full recipe calls for a 13 oz box of pasta,which is a LOT of pasta friends. Darla suggests you cook only until it is al dente because it will then be baked, but for my personal tastes I will cook it for longer next time. Whole wheat pasta is awesome, but it is definitely tougher than non-whole wheat pasta in general. I’d like it to be softer in the final product next time.

Then, you make the sauce all on your own! It is ridiculously easy and SO yummy. It just takes a few ingredients that you probably have in your cabinet already (except for 30-32 oz of tomato sauce) and it is quite yummy.

look its so yummy!

If you follow Darla’s recipe, this is where you will brown your sausage and dice your pepperonis. Since this is a pizza pasta bake, it is my personal opinion that you should put the things you love on a pizza into the pasta, so I opted for turkey pepperoni and black olives instead. The next time I make this, I think I’m going to make a veggie supreme version  with sauteed onions, olives, peppers, and mushrooms. Yum!

A note on the sauce: I really enjoy the flavor of the sauce. My only complaint is that I like my pizza and my pasta to be extra saucey! Next time, I will go with two 15 oz cans of tomato sauce and an extra 8 oz can in order to increase the sauce content.

After your add-ins (toppings, if you will) are all prepared, combine them with the sauce that you have oh so expertly simmered.

look at those black olives and pepperoni bits in all that saucey goodness!

Next you add the pasta to the sauce. You can mix it in the bowl, like I did:

don't all the pieces look so happy together?

Or you can pour them both into your pan and mix together there. Either way, the result is the same! Then you cover your pizza pasta with mozzarella cheese. Darla calls for two cups, but I went for more like three cups on my first try. I like things to be cheesy! Well, I like food to be cheesy. Less so jokes and people.

look at all that CHEESE!

Then you pop it in your preheated oven (which is a nice and toasty 350 degrees) and let it hang out for about 25 minutes. When I checked on mine the top was not brown, so I let it go for another five minutes. When it still was not brown I was way too hungry to give a shit and pulled it out anyway.

I think it still looks good and melty despite an absence of brown on the top

This next step is the hardest part: wait for ten minutes so it will be cool and collected and, most importantly, will not burn off your tastebuds or make awkward things happen to the roof of your mouth. After the requisite ten minutes have passed, you can TOTALLY eat it!

Word to the wise, if you are indeed using super solid whole wheat extra healthy pasta, you won’t need nearly as much as you think to get full. I promise! I found out the hard way.

Suggested pairing: your new copy of bitch magazine.

a meal fit for a hungry feminist

A few concluding thoughts on this highly successful baking adventure: This meal can be as healthy as you want (or as delectably greasy! both are valid choices.) because you have so much control over what happens in the process. I chose turkey pepperoni, whole wheat pasta, and reduced fat mozzarella simply because I knew I’d be eating it every day for a while and that better fits my daily eating style. This dish can easily be made low sodium (only 1 teaspoon of extra salt goes into the sauce and you can use low sodium tomato sauce or some other tomato source if you prefer), vegetarian, or vegan (if you MUST skip the cheese). Did I mention it’s easy? Because it totally is.

All right! My editing break is over. It’s back to the thesis grindstone for me, but at least I’m full of pizza pasta goodness!

Love, sisterhood, and lots of cheese,

me


TARDish Cupcakes Or: Why You Should Always Follow Directions and Use a Cookie Cutter

24 Aug

I had every intention of writing an ERA-related blog this week, but honestly? I do not feel like researching anything that doesn’t have to do with my thesis right now, and that’s OK.

So, today my roomate and I decided it was a good day to bake. I thought it would be fun to finally try one of those recipes from Bake It In A Cake! since I’ve been tumblr stalking them for months. I thought, why don’t I combine my desire for baking with my passion for Doctor Who?

Enter: The Plan

The original plan was to use blue sprinkles, blue icing, and blue food dye to make a blue funfetti-style white cake with blue shapes inside (perhaps a “D” or a box like the TARDIS) and blue icing. Then I realized this cake was all white cake and no chocolate, so I scrapped that idea. If it’s a simple from-a-box deal, I usually stick to yellow cake and chocolate icing. I decided I would just dye half of the batter one color and half another, and then use those two colors to make my cut out for the inside and then to fill in the rest of the cupcake. (If you take a gander at Bake It In A Cake! you’ll understand what I mean.)

I got back and tried to do some math to determine how much half of the batter would be. I thought that I could also possibly cut it down so I’d only have twelve cupcakes to contend with here in this apartment while thesising alone. (That’s always the issue with baking, isn’t it? Things go stale quickly and so you need people to share them with/need to be ready for a sugar coma.)

I also decided to copy Darla at Bakingdom‘s decision to work with the concept of weeping angels in her Doctor Who-inspired baking adventures. Of course, I’d just be trying to do a really simple angle outline to stick inside of a cupcake. I thought this or perhaps a “D” would be achievable.

False.

Here’s what happened.

I decided that 1/4c batter goes into each cupcake tin, so there must be approximately six cups of batter. Three cups should be baked and then I’d have enough left to fill up twelve cupcakes with the outside color.

I also decided to make the outside color of the cupcake blue like the TARDIS. Here’s as close as I got to TARDIS blue with my food dye and yellow cake batter:

My life is colorful, just like this.

I baked a thin layer of the yellow cake batter in a glass 9 x 13 pan with the intention of cutting (like, freehanding with a knife, because I don’t believe in spending money on cookie cutters) the shapes out once it cooled. I baked it for about fifteen minutes, since it was so spread out. I immediately transferred it to the freezer to cool down.

Here’s what happened with that business. The top layer of the cake turned into this cold, gooey, fragile bit that kept getting stuck on the knife, my hands, everything it touched. I don’t really mind shoving my hands into ground beef to make hamburgers, but I really minded this gooey cold cake substance. Yuck. I was pretty positive I hadn’t cooked it all the way through because of the top layer and because it was SO HARD TO CUT.

Also, note to readers: If you ever intend to do this, two things: 1. Don’t follow these directions, find a real recipe. 2. Butter and flour the pan you bake the cake in for cut outs, because just greasing it doesn’t make it come off quite easily enough for delicate symbols. Like the letter D. Or an angel.

So, now that my hands were covered in yellow cake goo and my cutouts were falling apart, I decided to just cut out circles of yellow cake to put in the middle so it would be like a really simple TARDIS: blue on the outside, yellow(ish) on the inside.

This is when I started to realize that my original calculations were wrong, because there was not nearly enough blue batter to make twelve cupcakes no matter what I did. I also had way too much yellow goo cake.

This is not what the inside of the TARDIS looks like. The inside of the TARDIS is lovely. This is a hot mess. But cold.

I used a spatula to get every little bit of blue cake batter into the cupcakes and ended up with nine. Let me put this to you in a way that makes sense: the box says that the batter is supposed to make twenty-four cupcakes. And I had nine.

I decided just to go with it and see what happened. In the end, I had two with hearts in them (because that seemed like a simple pattern and I saw it on Bake It In A Cake!), one with this little thing that started out as a W but then I realized looked like a (very, very simple and cubist) dalek, so I used that. I used one of my angels, too. The other five were just circles of yellow cake with blue around them.

At least they looked blue at this point.

I figured I could at least count on them to be blue and cute looking, like cupcakes are, when they came out of the oven. False. They looked like alien cupcakes (which, I suppose, is appropriate).

Seriously, one of them has a face and the rest of them look like green polyjuice potion.

I then went for the only option I had left: chocolate icing. The proof is in the non-pudding: Icing can even make greenish slitheen polyjuice cupcakes look edible and delicious:

See? You would totally eat these, right?

For a while, I was too full from all of my baking process samples (read: dipping my finger into the batter) to even consider a cupcake. I was also slightly annoyed with them for being a total epic baking fail. But then, I’ve had those before, and they turned out OK after left in a plastic bag overnight and dipped in coffee. My family said they were super delicious.

Finally, while watching a re-run of Stephen Colbert (on which I found out that our current representative to the United Stations is Susan Rice, who is a woman of color. How did I not know this? Because that is awesome.) I decided to give in and have a teeny tiny one so that I could write this blog with the crowning glory, a picture of my TARDIS cupcake, blue on the outside and yellowish on the inside:

I call it: The TARDish

For this tiny little unrecognizable blob of yellow, I worked for an hour and covered my counter in blue batter and yellow cake goo. I’ll take it.

And that, ladies and gents, is how you make a TARDish.

Good night!

Crafty Baking Adventures and Other Things I Do to Distract From my Thesis

28 Jul

So basically… my work right now is a little like that song they always sang on Lambchop. You know what I’m talking about? This one.

Anywho, I’m trying to trudge through and do a bit every day. While not trudging through that process, I’ve also gotten a little crafty and bakingish in order to feel better about procrastination. For example…

Aimee sent me the most awesome gift for my birthday.

BAM!

I was already trying to pick the most perfect present, but I could not find something on the same level of perfect giftyness, so I thought I would try to make something. Aimee is an awesome cook and has many excellent aprons, but I figured that she did not have a feminist themed one! My favorite baking blogger, Bakingdom, also makes aprons. She’s made a Harry Potter apron and a Tardis apron, and she was super awesome about sending me the pattern for the skirting at the bottom. I had this vision of an apron themed after the Feminist Majority Foundation‘s awesome This Is What A Feminist Looks Like shirts and things. As happens with crafts, my original vision did not end up being the finished project, but I’m pretty satisfied.

If you are ever jonesin to make an apron, you are more than welcome to use a pattern and do it all legit style, but if you are like me and don’t even know how to unfold a pattern… you can always just take an apron you already have and use that as a starting point. I am staying with people who have lots of aprons, so I went through a period of trying and seeing which parts fit the way I’d like the apron to fit.

A lot of the work was just making it up as I went. I had to take a picture of the skirt pattern, info about what the measurements were, and make a new pattern to scale. I measured the small side of the skirting to see how long the bottom of the apron should be, and then I used a paper bag (see how completely ridiculous my methods are?) and cut it to find the right curve for the bottom of the apron that would fit the skirt pattern.

I laid my ragtag pattern on top of the pink fabric and cut it out around the edges. I took a page out of Bakingdom’s book and used bias tape instead of trying to hem the thing, because basting and hemming makes me want to use my shins as pincushions. Just saying. So, I lined the edges of the apron with black bias tape and sewed it together.

Making apron strings from fabric has an effect similar to the basting and hemming on my state of stress filled zen, so I chose to use a thick grosgrain ribbon for the waist strings and a thinner grosgrain for the neck string. Easy peasy!

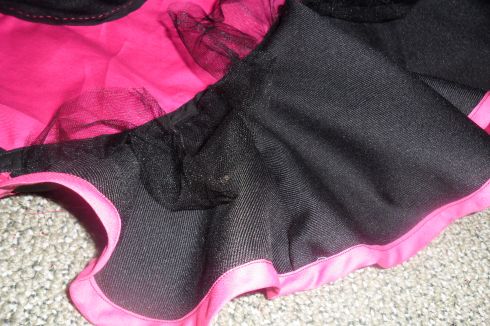
The skirt was a little more difficult, but I cut it out of the black fabric and lined the bottom with pink bias tape. I wanted the apron to be as bomb as possible, so I also opted for black sparkly tulle on top of the skirt. I also used bias tape to get the tulle and the skirt together and, again, avoid hemming. It was a little rough, and some of the edges were a little wonky, but in the end I felt pretty good about it. 

When I attached the skirt to the apron, I realized I had made the apron far too long. These things happen when you’re piecing it together like a puzzle. Anywho, you can always take away. I just pinned the skirt to the existing apron and tried it out until I found the right length. I sewed them together first so I could, you guessed it, avoid hemming the bottom. It worked out fine.

I wanted to add pockets, which was the easiest part of this process. I used the bias tape again and sewed them together using pink thread, because I like the hand-sewn look when you can see the thread. It’s like a little accent! Awesome.

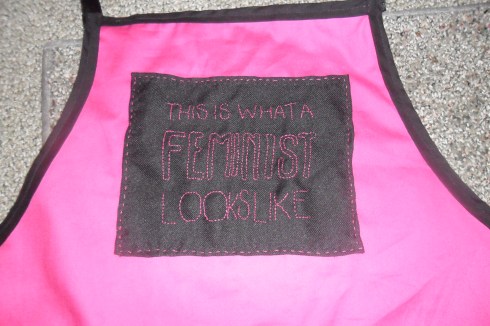
My original plan was to somehow paint “This is what a feminist looks like,” using the Feminist Majority Foundation t-shirts as a template. Hahaha. Fast forward to me, covered in spray fabric paint, and awfully frustrated. Take two!

I like free hand embroidering. And it’s not fancy embroidery, I’m talking like straight lines and simple outlines. So, I took some of the extra black fabric and used pink string to sew “This is what a feminist looks like” on it. I actually hemmed this bit, mainly because it was just a square and a very small one, at that. 

And that was the end! Ta-da! 

And then… I started listening to Trock, which is short for Time Lord Rock (yes, I’m that cool) and Comic Con geeking out about Doctor Who. I have this side purse thing. You know, the kind that goes across your chest and hangs out on your hip, but is small so it isn’t in your way? I like it, but it doesn’t really go with some of my outfits, if you know what I’m saying. So! I took some of the extra fabric from the apron and made a really basic bag with a TARDIS on it! A very simple TARDIS, but a TARDIS nonetheless. 

I have also been doing some baking fun. I made a checkerboard cake, which is a variation of the vertical layer cake from Bakingdom. I fully intended to make vertical layers, but one of the yellow cakes broke, so then I had to make new plans.

It’s late and I’m super sleepy, so I’m going to be lazy and just point you in the direction of other people’s instructions that I followed to bake this cake.

I got the process from Bakingdom here, along with the recipe for the yellow cake. After having made the cake, I think that all vertical layer cakes should use that kind of cake for a base. It cuts easily, it is firm enough to move around with your hands, and it is just fabulously delicious. Seriously. Awesome. But I’m pretty pos that with patience, sharp knives, and extra icing on hand just in case, you can turn any cake into a vertical layer cake. Fo sho. I wanted to do a chocolate cake, so I used Aimee’s favorite, which is this one. It is totally delicious and perfect, but it is so moist and a little crumbly, so it’s harder to cut.

Basically, what you do is bake your cakes (and if you want to make a two layer high cake you need to bake two batches, or four separate pans of cake) and then level them off. Trick I learned from this tutorial: if you level the cakes really soon, no more than five minutes, after pulling them out of the oven, set them on top of each other (each double, not all four) and throw them in the freezer, it helps them stick together instead of being little cake cubes. Anywho, you bake them, and then you put the two layers of each kind on top of each other. (Bakingdom has a good in depth explanation with pictures.) Then, using a template or cutouts or bowls or what have you, you cut the layers into the cake. You make a little cut on one side of the rings, so you can wrap them around each other, and then you do just that. Then, frost! The frosting is kind of hard, because the cake comes off easily since you trimmed it and stuff. Woohoo! Here is my finished cake. I am pretty proud of my first attempt.

Annnnd on that note, I’m going to hit the sack! Early morning tomorrow, lots to do and stuff!

Cupcakes A la Aimee

3 Jul

I keep attempting to blog about being in Wisconsin, but there is so much going on (that isn’t my thesis) that I am constantly sidetracked. However. Today was an epic day, and so it deserves a blog post.

We have been quite busy, from seeing Bridesmaids again for my birthday to going to a Burlesque show. Recently, we had a brat off at the house. I don’t think we will ever finish eating those brats. Oh my goodness.

Last night we were all out until about one in the A.M., and we had to wake up this morning in time to get to the Farmers’ Market by 7:30. Let’s just say, that was rough. Nothing a little spicy cheese bread and iced tea for breakfast couldn’t fix.

And then, MFS and I embarked on a baking adventure! Well, they’re cupcakes, but they are awesome.

A few days ago, MFS, the adopted parents and I were out at Concerts on the Square when a little birdy (a text message) brought me a picture from cupcakes that looked absolutely divine. When The Maple, the mastermind behind the cupcake goodness, explained that they were white cupcakes with lime curd and blueberry buttercream, I decided I had to have some.

The recipe is kind of made up, according to The Maple, so she had to type them up and send them my way before we could get started, and then, of course, the MFS and I got quite sidetracked by life. We had to declare a day cupcake day, and this is how we came to bake cupcakes on this lovely (hot and humid) Saturday in sunny Wisconsin.

I was informed by a reader that she enjoyed my attempt at a baking blog, so I’m going to give that a go again.

The Tale of the Epic Cupcake

The lime curd has to be cold when you finally put the cupcakes together, so we did that this afternoon shortly after buying our limes and blueberries.

The curd needs 2/3 c lime juice, so we juiced six limes.

Limes n such

You will need 1 t of grated lime zest, so you ought to zest that sucker before you’ve squeezed them all.

Look at that zesty lime!

It’s nice to work in a team, because as I was juicing the limes (which takes a bit of elbow grease), MFS was hard at work across the kitchen. First, she cracked open and separated the eggs, 2 whole eggs and 2 extra egg yolks.

Eggs n such

MFS then got to creaming 1 c sugar with 6 T softened salted butter.

MFS is pretty much awesome

Then, you add the 2 eggs and the 2 yolks, and then the lime juice. The Maple’s exact recipe words were: “It will look disgusting at this point; do not panic.”

Yeah, it looks a little lumpy.

Then, we put it in a small pan and cooked it at a medium-low heat. It started out looking like this:

Once you get started cooking, it starts to get smooth:

Smooth like butta. Probably because there's so much in it.

Then, after about 15-20 minutes, it gets thick and turns a more yellow color.

Look how yummy! Don't eat, it's super hot.

Then, you mix in the zest, put it in a bowl to cool, and cover with plastic wrap. You should “press the plastic wrap to the surface” and stick it in the fridge for a bit. You’ll need a couple hours.

When you’re ready to get down to cupcake business (to defeat the hun…gers?), be aware that this recipe is slightly more intense than other white cake recipes… but it’s worth it! First, as per usual, preheat your oven. In this case, to 350. First, you will cream 1 and 1/2 c sugar with 2/3 c softened salted butter, as MFS is doing in the picture below:

MFS rocks at creaming things

While she was busy at that, I set out all the other ingredients.

2 c flour, 2 egg yolks with 1 t vanilla, 2 t baking powder, 1 t salt, 1 c milk (also pictured:sugar. by this point you should already have used that.)

Put the vanilla in the yolks, and put the egg whites in a glass bowl (not plastic!). Put the yolk and vanilla into the creamed butter and sugar.

Look at them yolks, all up in the creamy, sugary butter.

Mix the remaining dry ingredients (flour, salt, and baking powder) together, and then add the milk and the dry mixture to the yolk/butter/vanilla/sugar mixture a little bit at a time.

Lookin pretty fly

Then, grab the egg whites and your handy dandy mixer. Beat them until they have stiff peaks, which means that when you pull the mixer out, the tips stay up and don’t droop over. Fold that into the other mixture. Now you are ready!

Ice cream scooping the batter into the cups, Bridesmaids style

Throw the cupcakes in the oven that you already preheated to 350, because you are brilliant. They should take about 20 minutes to bake.

Now it is time to start the icing. This is actually really simple, despite the fact that it sounds all fancy. First, you take 1 c of fresh blueberries and put it in a small saucepan.

Look at those yummy berries. Mmmm-Hmmm

Cook over medium heat until the berries start popping. Use a wooden spoon and smash them against the side of the pan. Once it looks kind of like a sauce, but is also a little chunky, take it off the heat.

That is delicious. Don't believe me? Lick the spoon.

Set that aside. We put ours in a ceramic bowl so it would cool. Once they are “mostly cool but still a little warm,” mix them in the butter and the vanilla. Then, take a bag of powdered sugar and mix in a little bit at a time until it is firm and icing-like, but stirrable. You don’t have to use a mixer, but we did.

Standing mixers. Love.

Now you get to hang out until the curd is cold and the icing and cupcakes are room temperature. Next, take a really sharp knife and cut little cones out of each cupcake on the top.

We found that you shouldn't worry about them being too small, because the lime curd is so rich.

Fill the cupcakes with lime curd, we just used spoons to do this part. Don’t worry if it’s kind of overflowing. You will have lime curd left over, and that is so yummy!

Now the icing! We lucked out, and the adopted parents have every kitchen utensil ever, so we got to use a pastry bag with a fancy tip. Usually, I just use a ziploc bag and cut the corner off. You have to use some sort of piping, because of the curd.

MFS is a pro.

Apply the icing however you like, and then use the extra blueberries for garnish. Ta-da! You are done!

Aren't they pretty? And they are also delicious.

And that was my baking adventure today! You should try them! They are fantastic.


Black and Whites, or, Why I Should Stick to Pie

17 May

Hello, lovely readers!

I have recently discovered the joys of reading baking blogs. I love reading about all of these delicious things and fancy baked goods that all the talented bloggers out there come up with. Though I have found quite a few that I enjoy (Bake It In A Cake, Angerburger , and Sugar Derby, for example) my favorite by far is Bakingdom. Full disclosure: I love this site because it is not only full of delicious treats but also fun crafts! Did I mention the blogger, Darla, is a big Harry Potter and Doctor Who fan? I know. Amazing! Plus, when I emailed her with a question about the aprons she makes (and they are fabulous), she actually emailed me back. Twice! And she emailed me a pattern! I fully intend to have my very own harry potter apron by the time the Deathly Hallows Part 2 comes out. Hell yes.

Anywho, in this little slice of summer I’ve carved out for myself here in Texas, I have been doing absolutely nothing since finishing my research design and thesis proposal. I’m still waiting to hear back from my chair and readers, and until then I see no reason to get started. Plus, who wants to start working on research when there is family around and tex mex to be had? Certainly not this feminist.

So, this last week and a half has consisted almost entirely of down time, and that down time has included devouring all ten of the Southern Vampire Mysteries (the books that True Blood is based on), starting Howard Zinn’s A People’s History of the United States, and trying my hand at some new-to-me recipes.

First, I made flour tortillas a la Zac. They turned out great, and they were so easy! If you want the recipe, just drop me a line. Perhaps I’ll do another blog about them later, because they actually came out well. Then, I made green beans a la Aimee. It was my first try at making a dish that has become one of my absolute favorites, so even though my mom and my step-dad say they were yummy, I still think I have a long way to go to get them just right. Finally, I gave in and decided to stop drooling over all of the gorgeous pictures and delicious recipes on Bakingdom and actually give one a whirl!

I chose to try out the recipe for Black and Whites, because no one here was familiar with them. It’s like the reverse of what I’ve been experiencing in New Jersey about most awesome foods (Blue Bell ice cream, Shiner beer, and queso, to name a few). It seemed pretty straightforward, and we had all of the ingredients except cake flour, so i figured I’d just forge on with all-purpose and try it out.

I had an excellent time experimenting with a family friend’s standing mixer, but because I was working in a kitchen in the middle of a group of people trying to talk, I don’t think I mixed the butter and sugar long enough, nor the egg, and I certainly overdid the mixing once adding in the flour mixture, but I had no idea about any of this as I spooned the batter onto parchment paper using an ice cream scoop.

The batter, on its way to becoming cookies

I dropped these onto the parchment paper, and everything looked (and tasted, because I cannot resist cookie dough of almost any kind) right, so I forged ahead.

All the little mounds of dough, ready for the oven

While they were cooking, I checked to see if their progress matched all of the awesome pictures from Bakingdom, which you can look at by clicking on the link listed up there somewhere.

Can you tell they're on the way from poofing to flattening?

I absolutely love the intense amount of step by step documentation that so many baking blogs give you, especially Bakingdom. These pictures should not be of any help to anyone, I just thought it would be fun to pretend that I was as good at this as the baking bloggers I love to read and that I could show you the kind of fun, finished product process that I so enjoy reading about. Hahaha. False.

I love black and whites because they are soft and cakelike in consistency, citrus-y in flavor, and covered in shiny but delicious vanilla and chocolate icing. The only part of the process that I stand by is my vanilla icing, which came out perfectly.

All iced up and nowhere to go... because I'd never take these out in public.

You can see that the white part is glossy and shiny. I have absolutely no idea what went wrong with the chocolate side, as its just the white plus melted unsweetened chocolate, but that was the least of my worries. The cookies were far too rounded, and way too hard. I have determined that multiple things could have caused this:

1. Distraction during measuring, which was not entirely my fault, and I don’t really think has anything to do with anything, but I’m putting it here just in case.

2. Overbeating/underbeating: my baking guru Aimee (yes, the Aimee of the green beans) explained to me, after reading through the recipe and in response to my sad texts of “my cookies! they are le horrible!”, that the first two steps (butter and sugar, then adding three eggs) should involve a lot of heavy mixing and beating, but then the last part (adding in the flour mixture and milk) should be as minimal as bakingly possible. I didn’t exactly do that. Nope. Not even kind of.

3. Overbaking: I thought that the cookies didn’t look brown enough on the edges, but I have since come to suspect that in that particular oven, fifteen minutes would have done just fine (instead of the eighteen I let them cook).

4. Wrong flour: The recipe called for half all purpose flour and half cake flour, but I didn’t see the point in having my parents buy new flour made specifically for cakes when they already had enough all purpose flour to make all the cookies and then some. I found out, later and from Aimee of course, that “cake flour is to all purpose flour as confectioner’s sugar is to sugar,” which made things make a bit more sense.

Long story short (or maybe just not as long), my cookies came out too hard, too thick, and too dry. Something in the chocolate icing was also out of whack. The great thing about cooking for family and friends of family is that they will almost always eat what you make, even if it is kind of horrible. They all maintained that the cookies had good flavor, and that they would go great with coffee for breakfast. I don’t care, I just hope someone actually likes them, since my personal response is immediate mortification.

My dad doesn't like soft cookies anyways, so he honestly thought they turned out great. In these picture, he is being proud that he figured out that the consistency problem could be tied to choice of flour.

All in all, I felt awful, because I’d dirtied someone else’s kitchen (which I also cleaned) and used up some of my parent’s baking supplies making cookies that did not look, taste, or feel quite the way they were supposed to. No one else seemed to share these sentiments but me. I fully intend to revisit this recipe later this summer, perhaps while in Madison, to see if I can finally conquer the black and whites.

Until next time…

-G